Search This Blog

Saturday, May 21, 2016

How to lock the screen in centos

How to lock the screen in centos 
 
http://ejd021-linux.blogspot.in/2011/06/how-to-lock-screen-in-centos.html
 

Hi all.. In windows we are using "Windows+L" short cut to lock the screen, the mouse movement or keyboard entry will unlock the screen and it will ask the system password to unlock the system.

In the same way in linux(centos) we can lock the screen by using the short cut key "ctrl+Alt+L". But this wont lock the screen.. yes.! mouse movement or keyboard entry will make the screen active.

Then how to lock the screen..?

We need to install "xlockmore" using yum or rpm.

Using rpm:

Here we need to install 3 packages.

Before that check the following packages are installed in your system or not using 'rpm -qa '.

1) libXp
2) openmotif
3) xlockmore


If not,

First we need to download the following packages..


# wget ftp://ftp.sunet.se/pub/Linux/distributions/centos/5.6/os/x86_64/CentOS/libXp-1.0.0-8.1.el5.x86_64.rpm

#wget ftp://ftp.sunet.se/pub/Linux/distributions/centos/5.6/os/x86_64/CentOS/openmotif-2.3.1-5.el5_5.1.x86_64.rpm

#wget ftp://ftp.univie.ac.at/systems/linux/dag/redhat/el5/en/x86_64/dag/RPMS/xlockmore-5.18-2.2.el5.rf.x86_64.rpm

Then install using rpm..

#rpm -iv libXp-1.0.0-8.1.el5.x86_64.rpm 
#rpm -iv openmotif-2.3.1-5.el5_5.1.x86_64.rpm
#rpm -iv xlockmore-5.18-2.2.el5.rf.x86_64.rpm


Now go to Application => Graphics => Xlock


Now your screen will get lock....

Friday, May 20, 2016

How to quickly and easily add a Red Hat Enterprise Linux 6 system to Microsoft Active Directory

https://www.dalemacartney.com/2012/07/06/how-to-quickly-and-easily-add-a-red-hat-enterprise-linux-6-system-to-microsoft-active-directory/

UPDATE!! .. This article also works perfectly on Windows 2012 Server as well as Windows Server 2008. The process is exactly the same.

I’ve had countless numbers of people ask me over the years how to add a Linux system to Active Directory.
Here is a really quick and simple way to do it using Windbind for userlookups, and Kerberos for authentication.
In this example, I will be using the below details
Windows Domain Name:         nt.example.com
Windows Domain NetBIOS Name: NT
Domain Controller:           dc01.nt.example.com
Client Server name:          server01.nt.example.com

Setup

1. Firstly, install the necessary components.
yum install -y samba-winbind samba-winbind-clients oddjob-mkhomedir pam_krb5 krb5-workstation

2. Make sure OddJobd is running at Startup. This is only for Red Hat Enterprise Linux 6 and other Red Hat based Operating systems.
Red Hat Enterprise Linux 5 will use pam_mkhomedir. pam_mkhomedir has SELinux issues at present, so oddjobd is the way to go.
chkconfig oddjobd on

3. Set authconfig to point to the relevant systems for Authentication.
Note: If you do not wish your users to log into your server via a shell, set –winbindtemplateshell to –winbindtemplateshell=/sbin/nologin
authconfig --update --kickstart --enablewinbind --smbsecurity=ads --smbworkgroup=NT --smbrealm=NT.EXAMPLE.COM --winbindtemplatehomedir=/home/%U --winbindtemplateshell=/bin/bash --enablewinbindusedefaultdomain --enablelocauthorize --enablekrb5 --krb5realm=NT.EXAMPLE.COM --enablekrb5kdcdns --enablekrb5realmdns --enablepamaccess

4. Just like in Windows, Add your system to the domain. Here I have used the Domain Administrator account, but any account with enough rights to add a system to the domain will suffice.
[root@server ~]# net ads join -U Administrator
Enter Administrator's password:
Using short domain name -- NT
Joined 'server' to realm 'nt.example.com'
Note: As you are now dealing with Active Directory, it now becomes time sensitive. Make sure your system clock is pointing to one of your Domain Controllers as the NTP server.
Otherwise you will end up with errors like this when you try to add the system to the domain.
[root@server ~]# net ads join -U Administrator
Enter Administrator's password:
Using short domain name -- NT
Joined 'SERVER' to realm 'nt.example.com'
[2012/07/06 17:24:04.397769,  0] libads/kerberos.c:333(ads_kinit_password)
  kerberos_kinit_password SERVER$@NT.EXAMPLE.COM failed: Clock skew too great
[root@server ~]#

5. Configure Winbind Backend
The default Winbind backend is great for single systems being added to Active Directory, however if you are in a very large Linux estate like I usually am, you will need to change the backend to ensure that all UID’s/GID’s match across all your systems.
To do this, add the below two lines to your global Samba configuration. Replace “NT” with your own Domain name.
idmap config NT:backend = rid
idmap config NT:range = 10000000-19999999
kerberos method = dedicated keytab
dedicated keytab file=/etc/krb5.keytab
Just so we are on the same page, my global configuration now looks like this
workgroup = NT
realm = NT.EXAMPLE.COM
security = ads
idmap uid = 16777216-33554431
idmap gid = 16777216-33554431
idmap config NT:backend = rid
idmap config NT:range = 10000000-19999999
kerberos method = dedicated keytab
dedicated keytab file=/etc/krb5.keytab
template homedir = /home/%U
template shell = /bin/bash
winbind use default domain = true
winbind offline logon = false

6. Restart Winbind service
Once you have added your system to the domain, it is important to restart the Winbind service.
[root@server ~]# service winbind restart
Shutting down Winbind services:                            [FAILED]
Starting Winbind services:                                 [  OK  ]
[root@server ~]#

7. Create a Kerberos keytab to enable Single Sign On (SSO)
[root@server ~]# net ads keytab create -U Administrator
Enter Administrator's password:
[root@server ~]#

8. Test configuration. If you receive no output for a known username, then something is wrong.
[root@server ~]# getent passwd Administrator
administrator:*:16777216:16777216:Administrator:/home/administrator:/bin/bash
[root@server ~]#
or, if you enabled shell logins,
User@workstation:~$ ssh Administrator@server.nt.example.com
Administrator@server.nt.example.com's password: 
Your password will expire in 11 days.

Creating home directory for administrator.
[administrator@server ~]$

9. This is optional, your home directory will not exist on the system when a new user logs in, run the below command if you with to have the homedir automatically created on first login.
[root@server ~]# authconfig --enablemkhomedir --update
Starting Winbind services:                                 [  OK  ]
Starting oddjobd:                                          [  OK  ]
[root@server ~]#
 
 
**************************************************************88
 
an you please inform how to unjoin from MS Active Directory without Likewise Open
Thanks
Dale Macartney October 31, 2013 10:52
Hi Sham
If you have used this article, and would like to remove a system from Active Directory which is using Winbind, you can do the following:
net ads leave -U domain-admin-user
This will prompt you for the password of your domain admin account. Once this is removed, you can simply uninstall the winbind packages from your local system (yum remove winbind).
Dale


Dale Macartney -- Squid Proxy integration with Active Directory – The quick and simple way

https://www.dalemacartney.com/2012/07/06/squid-proxy-integration-with-active-directory-the-quick-and-simple-way/

 
UPDATE: This guide originally showed you how to configure Squid to authenticate with Pam. However as many people have been searching for ways to authenticate with Kerberos, I have updated this article to refect the necessary changes.
The upside is, you now have Single Sign On (SSO) as a bonus. Your users will not be prompted for authentication when accessing the proxy server.

So, before we start. This guide will walk you through setting up a Red Hat Enterprise Linux 6.3 server running Squid Cache to authenticate Active Directory 2008R2 users.
Before proceeding with this article, please make sure you have added your Linux server to the Active Directory domain.You can use the guide here to get up and running quickly.

Now that we have the prerequisite completed, lets crack on.
1. Install the necessary packages.
yum install -y squid
2. Set Squid to start on boot
chkconfig squid on
3. Edit /etc/squid/squid.conf and add the below lines to the top of the file.
auth_param negotiate program /usr/lib64/squid/squid_kerb_auth
auth_param negotiate children 10
auth_param negotiate keep_alive on
auth_param basic credentialsttl 2 hours
acl ad_auth proxy_auth REQUIRE
4. Edit /etc/squid/squid.conf again, to change the rules that allow access to Squid.
Find the section “INSERT YOUR OWN RULE(S) HERE TO ALLOW ACCESS FROM YOUR CLIENTS” and change the lines beneath to reflect the following.
#http_access allow localnet
#http_access allow localhost
http_access allow ad_auth

# And finally deny all other access to this proxy
http_access deny all

# Squid normally listens to port 3128
http_port 3128
5. Now we need to create a service principle keytab file from Active Directory. You will need to install msktutil from the EPEL repositories to do this.
[root@proxy01 /]# yum install -y msktutil

[root@proxy01 /]# kinit administrator@EXAMPLE.COM
Password for administrator@EXAMPLE.COM:
[root@proxy01 /]# msktutil -c -b "CN=COMPUTERS" -s HTTP/proxy02.example.com -k /etc/squid/squid.keytab --computer-name proxy02 --upn HTTP/proxy02.example.com --server dc01.example.com --enctypes 28    

[root@proxy01 /]# chgrp squid /etc/squid/squid.keytab

[root@proxy01 /]# chmod 740 /etc/squid/squid.keytab

6. Update your Squid startup script to load your new keytab file on service startup.
Edit /etc/init.d/squid and find the section that looks as follows
start() {
probe

parse=`$SQUID -k parse -f $SQUID_CONF 2>&1`
RETVAL=$?
.......
and add the two additional lines so it appears as follows
start() {
KRB5_KTNAME=/etc/squid/squid.keytab
export KRB5_KTNAME
probe

parse=`$SQUID -k parse -f $SQUID_CONF 2>&1`
RETVAL=$?
.......
Save and exit, then start/restart the service
[root@proxy01 /]# service squid restart
Stopping squid: ................                           [  OK  ]
Starting squid: .                                          [  OK  ]
[root@proxy01 /]#
7. Open port 3128 on your local firewall
iptables -I INPUT -p tcp --dport 3128 -j ACCEPT
service iptables save
8. Configure your browser of choice to point to your Squid server. Please refer to your Browsers documentation on how to do this.
9. Watch the Squid logs whilst you attempt to browse the web
tail -f /var/log/squid/*
When you browse to a url, if all things work perfectly, you will proceed to the url. This means your authentication was successful.
10. Verify the output in your logs.
If you have authenticated successful in your browser, you will see something like the below in your logs. In this situation, I authenticated as the user “wuser1″.
==> /var/log/squid/access.log
1343654614.470   2902 10.0.2.200 TCP_MISS/200 15355 GET http://www.redhat.com/ wuser1@EXAMPLE.COM DIRECT/2.19.119.214 text/html


Installing and configuring SquidNT

http://www.papercut.com/kb/Main/InstallingAndConfiguringSquidNTProxy


Installing and configuring SquidNT

Introduction

PaperCut Internet Charging and Quotas requires a proxy server to manage Internet connectivity and log internet usage by your users. Squid is one of the best known proxy servers, and typically is run on a Linux/Unix machine, however in some environments a proxy needs to be run on a Windows machine. Fortunately Squid is available for Windows, and is available for download as the SquidNT package.
(To setup Squid on a Linux/Unix machine and get configure it to authenticate with Windows, see our article Configuring Squid on Linux to authenticate with Active Directory.)

Installing SquidNT

Download the latest version of SquidNT from here.
This guide has been written for 2.5.STABLE14-NT (download). The guide has also been updated to work with Squid 2.6.
Unzip the Squid zip file (e.g. squid-2.5.STABLE14-NT-bin.zip) file to a temporary directory. This will create a folder called squid-2.5.STABLE14-NT-bin\squid. Move the squid subdirectory to a location where you want Squid to be installed. E.g. c:\squid. (NOTE: You cannot install Squid in a directory containing spaces, like C:\Program Files.)
Open a command line window (cmd.exe), and change to the directory you installed Squid to. E.g. cd \squid
Install the Squid service by running the following:
   C:\squid>sbin\squid.exe –i
Setup the default config files by copying the template configuration files in C:\squid. Copy the following three files to C:\squid\etc.
   squid.conf.default      to C:\squid\etc\squid.conf
   mime.conf.default       to C:\squid\etc\mime.conf
   cachemgr.conf.default   to C:\squid\etc\cachemgr.conf
Then create the Squid cache directories by running the following:
   C:\squid>sbin\squid -z
Squid is now ready to start. Start the Squid NT service from the Services Control Panel applet. (Control Panel→Administrative Tools→Services). If Squid starts correctly you will not receive an error, and the cache log file will not contain any errors (C:\squid\var\logs\cache.log).

Configuring user authentication

In this configuration Squid is locked down to not allow any access, so the config file needs to be modified to allow connections to users on the network. Shutdown the Squid service.
Open the Squid config file (C:\squid\etc\squid.conf).
To enable authentication against your Windows domain or Active Directory, add the following to your config file around line 1290. This tells Squid to use NTLM authentication (i.e. automatically login users without prompting for a password).
For Squid 2.5:
   auth_param ntlm program c:/squid/libexec/win32_ntlm_auth.exe
   auth_param ntlm children 5
   auth_param ntlm max_challenge_reuses 0
   auth_param ntlm max_challenge_lifetime 2 minutes
   auth_param ntlm use_ntlm_negotiate on
For Squid 2.6:
   auth_param ntlm program c:/squid/libexec/mswin_ntlm_auth.exe
   auth_param ntlm children 5
Then define an ACL (access control list) entry that allows users on your network to use the proxy if authenticated. Go to approximately line 1830 of the file, and add the lines:
   acl localnet proxy_auth REQUIRED src 192.168.1.0/24
   http_access allow localnet
(But change the IP address mask as appropriate for your network. You can specify multiple network masks by separating them with spaces).
Now restart Squid and ensure that it starts correctly. Configure a browser to use the Squid proxy (port 3128 by default), and try to access an external web site. You should be able to visit the site successfully. To check that the authentication is working correctly open the C:\squid\var\logs\access.log file, and you should see log entries for the web site you visited, and importantly your username in the log file. Below are sample logs from visiting google.com. Note the username vm-domain\administrator, where vm-domain is the name of the domain, and administrator is the name of the user.
   1118015367.061    703 127.0.0.1 TCP_MISS/302 405 GET http://google.com/ vm-domain\administrator DIRECT/216.239.57.99 text/html
   1118015367.749    688 127.0.0.1 TCP_MISS/302 411 GET http://www.google.com/ vm-domain\administrator DIRECT/66.102.7.104 text/html

Allowing access only to members of a Windows Group

The next step is to only allow users access if they belong to a Windows security group. This can be used to enforce Internet access policy on your domain, and allow PaperCut to restrict access to users who have used their entire available quota. First we need to add the external ACL types to check for Windows group membership. Go to about line 1396 and add the following:
For Squid 2.5:
   external_acl_type win_domain_group ttl=120 %LOGIN c:/squid/libexec/win32_check_group.exe -G
   external_acl_type win_local_group ttl=120 %LOGIN c:/squid/libexec/win32_check_group.exe
For Squid 2.6:
   external_acl_type win_domain_group ttl=120 %LOGIN c:/squid/libexec/mswin_check_lm_group.exe -G
   external_acl_type win_local_group ttl=120 %LOGIN c:/squid/libexec/mswin_check_lm_group.exe
(The first entry is used to check domain group membership, the second is for local groups. You only have to add the lines you are going to use. Users of PaperCut typically use domain groups, so only the first line would be necessary).
Now we need to define the ACL to only allow access to members of a particular group ( e.g. a domain group called InternetUsers). Go to the line config file where the acl localnet entry was defined (approx line 1850), and replace the previsous ACL definitions with:
   acl localnet proxy_auth REQUIRED src 192.168.1.0/24
   acl InetAllow external win_domain_group InternetUsers
   http_access allow InetAllow
Ensure that you use the IP mask appropriate for your network. In the above example InternetUsers is a domain group. Change the group name as appropriate for your network. If your group is a local group, the use the win_local_group external ACL type instead.
(Make sure you remove the http_access allow localnet line that was defined earlier, otherwise all users on the network will have access, even if they do not belong to the group.)
Restart Squid, and now only members of the InternetUsers group will have access to the Internet via the proxy.
NOTE: If you have the need to deny Internet access for members of another Windows security group, you can set up a InternetDenyGroup the same way as above and then define an InetDeny ACL. You can then specify a http_access deny rule as follows:
   http_access deny InetDeny

Verifying the configuration

Restart Squid (if you have not done so already).
As a user that belongs to the InternetUsers group:
  • Make sure the browser is setup to user the proxy (port 3128 by default)
  • Browse the Internet for a few minutes (you should be allowed to view all pages).
  • Check the C:\squid\var\logs\access.log, and make sure your username is being logged.
As a user that does not belong to the InternetUsers group:
  • Make sure the browser is setup to user the proxy (port 3128 by default)
  • Try to browse the Internet (you should be denied access by the Squid proxy).
  • Check the C:\squid\var\logs\access.log, and make sure you see TCP_DENIED entries that contain the correct username.
If this all works, then you’re ready to use PaperCut with SquidNT…
  • In Options→Net Charging Options, point PaperCut to the C:\squid\var\logs log directory.
  • Set the log file mask to access.log
  • And then press the “Test and Apply Settings” button. You should see some summarized net access usage.

Log Rotation

Squid NT does not rotate its log files, so on large sites these files will grow very large. We recommend implementing a simple rotation policy which improves the performance of your system and allows easy archiving of old logs.
We have written a simple batch file that performs a log rotation by stopping squid, renaming access.log to access-YYYY-MM-DD.log, and then restarting Squid. Use the Windows Task Scheduler to schedule the following batch file to be run regularly (e.g. daily or weekly). NOTE: Make sure you setup the scheduled task to run as a user with permissions to stop/start the Squid service.
Squid 2.6 changed the name of the Squid service, so make sure you download the correct version of the script.

Troubleshooting

If Squid fails to start then it is best to check the following two log files. They will usually give you a hint about the cause of the problem (e.g. a syntax problem in the squid.conf file).
   C:\squid\sbin\squid.exe.log
   C:\squid\var\logs\cache.log
 
 ********************************************************************************
Thank for the clear and concise instruction. It has saved my day!
However, one thing the article has forgot to mention is the fact that the proxy server itself must be also member of the requested domain, otherwise the authentication will fail because Squid (or ntlm-authen) can not known where to lookup after user information.
Another tips: nested group does not work. It means you can not nest (sub) groups in a (master) group than let check membership against the master group. You can check user against direct memebership only. If  you want to have many groups, you must create additional ACLs to verify internet access.
For testing purpose, you often want to change group membership to test-out verious scenarios. You should remember to restart the squid service after each change, otherwise Squid will cache the last authentication results and the changed memebership would not be in effect.
Last but not least: close your browser completely if you want SquidNT to restart really fast.


*******************************
 
I created an installer to take care of all of this for you. Check out http://www.zenplatypus.com/pro..., and make sure you read the readme before installing. It's 100% stable, but there are a few gotchas. Namely, save installer and run it locally, not from the server. For some reason, that bombs... Feedback is appreciated!
************************************************************88

Configuring Squid on Linux to authenticate with Active Directory

http://www.papercut.com/kb/Main/ConfiguringSquidProxyToAuthenticateWithActiveDirectory


Configuring Squid on Linux to authenticate with Active Directory

Introduction

PaperCut Internet Charging and Quotas requires a proxy server to manage Internet connectivity and log internet usage by your users. If you would like to use Squid on Linux/Unix as your proxy with PaperCut, then your Squid proxy needs to be configured to authenticate users with Windows. This allows Squid to log usernames in the Squid access logs and allows only users with remaining Internet Quota access to the Internet. (If you would prefer to run Squid on Windows, then read our article Installing and configuring SquidNT. Setting up the authentication with the windows domain is considerably simpler than configuring LDAP on Linux/Unix)
This document describes how to configure Squid to authenticate with a Windows Active Directory and only allow Internet Access to users that are members of a particular Windows security/domain group.
Microsoft Active Directory is an LDAP v3 compliant directory and therefore can be used as a mechanism to authenticate users. Squid supports LDAP v3 and an authentication method. You can achieve similar results by using Samba and Winbind, however that process is much more involved and requires the Squid server machine to become a member of the domain.
Using the Squid LDAP authentication helpers, you can achieve Active Directory user authentication with some simple Squid configuration. There is no need to implement full Samba Winbind integration.
You will require Squid 2.5 or greater (with LDAP helpers). Some information on these modules can be found here:
If your Squid installation has LDAP support compiled in, you will find 2 files in “/usr/lib/squid/” (or you equivalent location where Squid is installed)
  • ldap_auth (or sometime named squid_ldap_auth)
  • squid_ldap_group
These files perform LDAP authentication and group membership checks against and LDAP server of your choice. E.g. Active Directory on Windows, or OpenLDAP (or other LDAP server on) Novell, Linux, Solaris, etc.

Configuring Squid LDAP Authentication

The first step is to configure Squid to authenticate usernames/passwords with the Active Directory. You will need to open your Squid configuration file (squid.conf) and make the following changes:
Find the auth param section of the config file (TAG: auth_param), and change the auth param basic program line to look like this. (Indented text indicates one line)
   auth_param basic program /usr/lib/squid/ldap_auth -R 
       -b “dc=vm-domain,dc=papercut,dc=com” 
       -D “cn=Administrator,cn=Users,dc=your,dc=domain,dc=com”
       -w “password” -f sAMAccountName=%s -h 192.168.1.75
   auth_param basic children 5
   auth_param basic realm Your Organisation Name
   auth_param basic credentialsttl 5 minutes
These settings tell Squid authenticate names/passwords in the Active Directory.
  • The -b option indicated the LDAP base distinguished name of your domain. E.g. your.domain.com would be dc=your,dc=domain,dc=com
  • The –D option indicates the user that is used to perform the LDAP query. (e.g an Administrator. This example uses the built-in Administrator user, however you can use another user of your choice.
  • The –w option is the password for the user specified in the –D option. For better security you can store the password in a file and use the –W /path/to/password_file syntax instead
  • -h is used to indicate the LDAP server to connect to. E.g. your domain controller.
  • -R is needed to make Squid authenticate against Windows AD
  • The –f option is the LDAP query used to lookup the user. In the above example, sAMAccountName=%s, will match if the user’s Windows logon name matches the username entered when prompted by Squid. You can search any value in the LDAP filter query. You may need to use an LDAP search query tool to help get the syntax correct for the –f search filter.
  • The %s is replaced with what the user enters as their username.
Remember to restart Squid to make these changes to come into effect.

Configuring Group Based Internet Access

Once the user has authenticated, you can define which users have access to network resources (i.e. the internet) using Squid access control lists (ACLs). Squid ACLs are a complex topic and allow very sophisticated control. This document only describes the basic configuration required to allow Active Directory / LDAP group checking - a requirement for PaperCut to deny/allow internet access. For further information on ACL syntax and configuration see the Squid documentation and FAQ.
In the Squid configuration file, find the external ACL section (TAG: external_acl_type) and specify the following external ACL (Inetgroup is arbitrary, make this anything appropriate). Note that this is all on one line.
   external_acl_type InetGroup %LOGIN /usr/lib/squid/squid_ldap_group -R 
       -b “dc=vm-domain,dc=papercut,dc=com” 
       -D “cn=Administrator,cn=Users,dc=your,dc=domain,dc=com”
       -w “password” 
       -f “(&(objectclass=person)(sAMAccountName=%v)(memberof=cn=%a,cn=users,dc=your,dc=domain,dc=com))” 
       -h 192.168.1.75
Most of this is similar to the LDAP authentication section above. The variable %v relates to the username and %a is the group given in the ACL (below). Ensure that the “memberof” filter is adjusted to where your LDAP internet group is defined. E.g. If you have an organizational unit call “you.domain.com/students”, and this contains a group called “InternetAccessGroup”, then the “memberof” part of the filter should be: memberof=cn=%a,ou=students,dc=your,dc=domain,dc=com
Then enter the values below in the ACL area (Tag: acl) of squid.conf, modifying your internal subnet as appropriate.
   acl localnet proxy_auth REQUIRED src 192.168.1.0/24

   acl InetAccess external InetGroup InternetAccessGroup
The ACL names are InetAccess, they are arbitrary and can be changed to suit your environment. InetGroup is the the External ACL name created above. The Active Directory groups that allow internet access is InternetAccessGroup. This is the name of the matching group in the Active Directory.
Now that you have completed the ACL you can reference them in the http_access area of Squid.conf:
   http_access allow InetAccess
You will need to restart Squid for these changes to come into effect.
You should then be able to try to access the Internet using Squid, and should be prompted for your Windows username and password. Only authenticated users AND users belonging to the “InternetAccessGroup” will be allowed access to the internet. This test by manually adding and removing users from the group using the Active Directory user management tools. The users should be granted/denied access depending on their AD group membership.
NOTE: If you have the need to deny Internet access for members of another Windows security group, you can set up a “InternetDenyGroup” the same way as above and then define an InetDeny ACL. You can then specify a http_access deny rule as follows:
   http_access deny InetDeny

Acknowledgments

Thanks to Ryan Brinch (Network Administrator, Linwood College, New Zealand) for his assistance helping PaperCut Software write this guide. Ryan would also like to thank Stephen Fergusson, for helping in the reviewing and checking this document.

Web Filtering On Squid 3 With QuintoLabs Content Security 1.4 And Windows Active Directory Integration

From the link:  https://www.howtoforge.com/web-filtering-on-squid-3-with-quintolabs-content-security-1.4-and-windows-active-directory-integration


This HOWTO will show you how to set up a Squid proxy server deployed on CentOS or RedHat 6 Linux with web and content filtering done by QuintoLabs Content Security with proxy users transparently authenticated by Windows 2008 R2 based Active Directory. This is the work in progress and all comments are welcomed. The HOWTO is targeted at novice users and may sometimes seem too thorough for more advanced gurus. No compilation magic will be involved in our setup so any system administrator accustomed to Windows will be able to easily follow the instructions. :)
We will use VMWare's Workstation 8 to setup the staging test lab to make sure everything works before deploying it on the production servers and real hardware. The chosen virtualization platform does not really matter much and any other virtualization solution can be successfully used too.

Prerequisites

The test lab will contain three machines - a domain controller running Microsoft Windows 2008 R2 server, a user machine running Windows 7 and a proxy machine running CentOS 6 with Squid Proxy 3 coming from standard repository. I presume you have ISOs of Windows Server R2, Windows 7 and RedHat (CentOS) 6 Linuxes somewhere around you. I also presume installation of Microsoft Windows and Active Directory is not a problem for you.
The domain we are creating is called example.lan. The IP addresses in use come from standard network used in NAT networking in VMWare Workstation - 192.168.28.0. Name of the Domain Controller will be dc.example.lan, proxy will be called proxy.example.lan and client workstation client.example.lan.

Step 1. Install Domain Controller

First, perform basic installation of Microsoft Windows and do the initial post install configuration.
  1. Create a new virtual machine for domain controller. Put the Windows Server ISO into the virtual CD drive and install it. Set the Administrator's password to "P@ssw0rd" (without quotes).
  2. After installation finishes set the static IP address of the server to 192.168.28.20, subnet mask 255.255.255.0, default gateway 192.168.28.2. Set the preferred DNS server to 192.168.28.2. Start the web browser and navigate to your favorite web site to test that Internet connection is working properly.
  3. Set the time zone on dc.example.lan to the one you live in.
  4. Change the name of the computer to "dc" (without quotes) so that after installation of the Active Directory and DNS server later our domain controller has the FQDN address of dc.example.lan.
Now install Active Directory.
  1. Click Start - Administrative Tools - Server Manager and run the Roles Wizard to add the "Active Directory Domain Services" role.
  2. When role wizard finishes, open the command prompt and run "dcpromo.exe" to set up the New Domain in a New Forest. Specify example.lan as the FQDN name of the forest root domain. Leave Forest and Domain functional levels on "Windows Server 2003", mark DNS server as the additional option for this domain controller. When installation wizard complains about "A delegation for this DNS server cannot be created because the authoritative parent zone cannot be found or it does not run Windows DNS server" just say Yes to continue the installation and install a new instance of DNS server on this domain controller. Wait a little until installation is finished. Then reboot the VM.
Now set up static IP address information for dc.example.lan and proxy.example.lan hosts.
  1. Using DNS management snap-in at dc.example.lan create a primary IPv4 Reverse DNS Lookup zone for network id 192.168.28, set Replication Scope "to all DNS servers running on domain controllers in this domain: example.lan" and allow both nonsecure and secure dynamic updates.
  2. Add new pointer (PTR) record for the dc.example.lan and check using nslookup that dc.example.lan can be successfully resolved into its IP address (192.168.28.20) and vice versa.
  3. Add Host (A) and Pointer (PTR) records for the proxy.example.lan and check using nslookup that proxy.example.lan can be successfully resolved into its IP address (192.168.28.21) and vice versa.

Step 2. Install Windows 7 Client Machine

Now create a VM that will act as a machine for the users of the proxy. Give VM a name - client.example.lan, set up Windows 7 as you normally do, join the machine to the example.lan domain created on Step 1 and make a bunch of domain users that will act as proxy clients.

Step 3. Install CentOS Proxy Machine

Create a new virtual machine named proxy.example.lan. Ensure the network adapter is set to "NAT" mode. Start the VM and follow the steps of the CentOS install wizard mostly accepting the defaults. Configure machine hostname as "proxy.example.lan" and root password as "P@ssw0rd" (without quotation marks). Wait a little until the installation is complete and then reboot the system.
NOTE 1: For the purpose of this howto I have SELinux explicitly disabled in /etc/selinux/config.
NOTE 2: For the purpose of this howto I have firewall explicitly disabled by typing #chkconfig iptables off and #chkconfig ip6tables off in the root terminal and restarting the proxy.example.lan VM.

Step 3.1 - Configure Networking

CentOS 6 deployed as VM usually does not have network subsystem enabled by default. In order to enable networking we need to do the following:
  1. Set the static IP address in /etc/sysconfig/network-scripts/ifcfg-eth0
    BOOTPROTO=static
    NETMASK=255.255.255.0
    IPADDR=192.168.28.21
    ONBOOT=yes
  2. Set the default gateway in /etc/sysconfig/network
    GATEWAY=192.168.28.2
  3. Point to the DNS server at dc.example.lan by editing /etc/resolv.conf
    nameserver 192.168.28.20
Restart your network subsystem by
# /etc/init.d/network restart
or by just restarting the virtual machine. After restart confirm that the network functions correctly by typing the following commands in the terminal and watching for any error outputs
$ping -c 3 192.168.28.2
Finally update the VM
# yum update
and install needed prerequisites for the next steps:
# yum install bind-utils

Step 3.2 - Configure Network Time Synchronization (NTP)

To perform successful Kerberos authentication system time on proxy.domain.lan must be synchronized with system time on dc.example.lan. The easiest way to do that is to install network synchronization server and point it to the domain controller.
  1. Install NTP server:
    # yum install ntp
  2. Make it start automatically at system boot time
    #chkconfig ntpd on
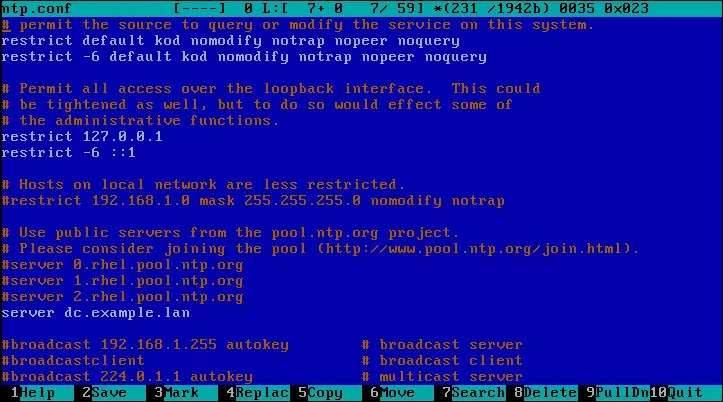
  3. Open /etc/ntp.conf and add the name of the domain controller:
  4. To perform initial time sync stop the service
    #service ntpd stop
    and run the manual sync command
    #ntpdate -b dc.example.lan
    Then start the NTP service again
    #service ntpd start
NOTE: If you get "Clock skew too great while getting initial credentials" later while running the kinit utility then the sync was probably not successful and you are advised to check that the server name in /etc/ntp.conf is correct and restart the ntpd service. Log files at /var/log/messages may contain more information about the reason of unsuccessful synchronization.

Step 3.3 - Install Kerberos

All needed Kerberos packages are installed by default in CentOS. But to ensure you really have all the needed Kerberos packages on the proxy.example.lan type
# yum install krb5-workstation krb5-libs
Kerberos configuration is stored in /etc/krb5.conf, open it with the text editor and change the contents to the following:
[logging]
 default = FILE:/var/log/krb5libs.log
 kdc = FILE:/var/log/krb5kdc.log
 admin_server = FILE:/var/log/kadmind.log

[libdefaults]
 default_realm = EXAMPLE.LAN
 dns_lookup_realm = false
 dns_lookup_kdc = false
 ticket_lifetime = 24h
 renew_lifetime = 7d
 forwardable = true
 default_tgs_enctypes = rc4-hmac
 default_tkt_enctypes = rc4-hmac
 permitted_enctypes = rc4-hmac

[realms]
 EXAMPLE.LAN = {
  kdc = dc.example.lan
  admin_server = dc.example.lan
  default_domain = example.lan
 }

[domain_realm]
 .example.lan = EXAMPLE.LAN
 example.lan = EXAMPLE.LAN
To test that Kerberos authentication is set up correctly type in the root terminal
# kinit Administrator@EXAMPLE.LAN
The command should complete without errors. The command
# klist
should print the info about acquired Kerberos ticket.
Ticket cache: FILE:/tmp/krb5cc_0
Default principal: Administrator@EXAMPLE.LAN

Valid starting     Expires            Service principal
12/07/11 11:07:58  12/07/11 21:08:00  krbtgt/EXAMPLE.LAN@EXAMPLE.LAN
    renew until 12/14/11 11:07:58
Now reboot the VM.

Step 3.4 - Install Samba and Join the proxy.example.lan to Active Directory

NOTE: this step heavily relies on RedHat 6 Documentation side at http://docs.redhat.com/docs/en-US/Red_Hat_Enterprise_Linux/index.html, especially on books "Deployment Guide" and "Enterprise Identity Management Guide".
In order to be able to transparently authenticate clients of Squid proxy using their Active Directory's credentials the server with Squid must be joined into the Active Directory domain (i.e. example.lan). The easiest way to do it is to run Samba on the proxy machine.
  1. Install Samba by typing
    # yum install samba
  2. Make it always start at boot time
    # chkconfig smb on
    and
    # chkconfig nmb on
  3. Open the /etc/samba/smb.conf and ensure its contents look like this (this is the result of running testparm -s on proxy.example.lan):
    [global]
     workgroup = EXAMPLE
     realm = EXAMPLE.LAN
     server string = Samba Server Version %v
     security = ADS
     log file = /var/log/samba/log.%m
     max log size = 50
     cups options = raw
    
    [homes]
     comment = Home Directories
     read only = No
     browseable = No
    
    [printers]
     comment = All Printers
     path = /var/spool/samba
     printable = Yes
     browseable = No
    
    Note we set workgroup to EXAMPLE, realm to EXAMPLE.LAN (capital letters) and security to ads.
  4. Restart Samba services
    #service smb restart
    and
    #service nmb restart
If you now browse the network from the client.example.lan you should see a proxy machine in the EXAMPLE workgroup.
Now join the machine proxy.example.lan into the Active Directory:
  1. Stop Samba services by typing
    # service smb stop
    and
    #service nmb stop
  2. Initialize Kerberos subsystem on proxy.example.lan by typing
    # kinit Administrator@EXAMPLE.LAN
    , it should ask for password, and complete without errors.
  3. Ensure you got a correct Kerberos ticket by typing
    # klist
  4. Join Active Directory by typing
    # net ads join -S dc.example.lan -U Administrator%P@ssw0rd
    . You should get something like this as an output: join_ad

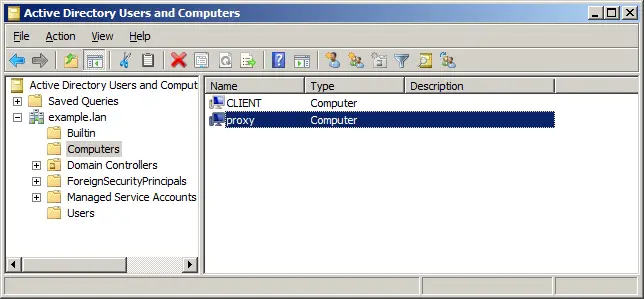
  5. Open "Users and Computers" snap in on dc.example.lan and ensure the proxy computer account now present in the "Computers" tree node
    joined_proxy
  6. Reboot the proxy.example.lan VM.

    Windows Active Directory Integration - Page 2

    Step 4. Install Squid Web Caching Proxy

    Now we need to install Squid proxy on the proxy.example.lan and set up the Kerberos Negotiate Authentication so that users do not enter their passwords while browsing through Squid and still we are able to see the user name in the logs.
  7. Type
    # yum install squid
  8. Open /etc/squid/squid.conf and add the following line visible_hostname proxy.example.lan. Also check that http_access allow localnet and acl localnet src 192.168.28.0/24 are present in the config file.
  9. Make Squid autostart at system boot:
    # chkconfig squid on
  10. Reboot your VM or just start squid for the first time manually
    # service squid start
Verify that squid runs correctly by pointing your users browser from client.example.lan to the name of the proxy server (proxy.example.lan) and surfing to some of your favorite websites.
In order to enable Kerberos Negotiate Authentication on Squid do the following:
  1. Add entry to default keytab file (/etc/krb5.keytab) using Samba:
    [root@proxy ~]# net ads keytab add HTTP -U administrator
    Processing principals to add...
    Enter administrator's password:
  2. Verify the service principals were successfully written to the keytab file:
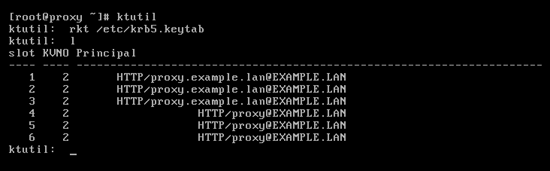
    verify_keytab
  3. Change owner of the /etc/krb5.keytab to squid:squid:
    # chown squid:squid /etc/krb5.keytab
    and set access permissions to 400 (read only)
    # chmod 400 /etc/krb5.keytab
    Note: this setup implies Squid is the only kerberized service on the machine, if more kerberized services are present then keytab should reside in /etc/squid directory and Squid must be told to use it through e.g. environment variable KRB5_KTNAME
  4. Add the following to Squid configuration file /etc/squid/squid.conf at the top of the file:
    #
    # Setup NEGOTIATE authentication for Active Directory with Kerberos
    #
    auth_param negotiate program /usr/lib/squid/negotiate_kerb_auth -s HTTP/proxy
    auth_param negotiate children 10
    auth_param negotiate keep_alive on
    #
    # to see the negotiator log messages in the /var/log/squid/cache.log uncomment
    # debug_options 29,9 and pass additional -d parameter to negotiate_kerb_auth
    #
    acl auth proxy_auth REQUIRED
    
    And the following after the "INSERT YOUR OWN RULE(S)" section:
    #
    # INSERT YOUR OWN RULE(S) HERE TO ALLOW ACCESS FROM YOUR CLIENTS
    #
    http_access deny !auth
    http_access allow auth
    
    # Example rule allowing access from your local networks.
    # Adapt localnet in the ACL section to list your (internal) IP networks
    # from where browsing should be allowed
    #http_access allow localnet
    #http_access allow localhost
    
    # And finally deny all other access to this proxy
    http_access deny all
    
Finally restart the VM. Open Internet Explorer on client.example.lan, Squid should not ask for authentication and log files in /var/log/squid/*.log should contain correct name of the browsing user.

Step 5. Install Apache Web Server

In order to be able to see the status and report information for Squid and QuintoLabs Content Security it is advised to also install Apache.
  1. Typing the following in the root terminal:
    # yum install httpd php mod_wsgi
  2. Make Apache autostart on boot:
    # chkconfig httpd on
  3. Reboot your VM or just start Apache for the first time manually by typing
    service httpd start
Open your browser and navigate to http://proxy.example.lan. You should see the “It Works!” greetings from Apache.

Step 6. Install QuintoLabs Content Security 1.4.2

Next step is to install the Content Security 1.4.2 for Squid from QuintoLabs (I will refer to it as qlproxy further in text). For those who do not know, QuintoLabs Content Security is an ICAP daemon/URL rewriter that integrates with existing Squid proxy server and provides rich content filtering functionality to sanitize web traffic passing into internal home / enterprise network. It may be used to block illegal or potentially malicious file downloads, remove annoying advertisements, prevent access to various categories of the web sites and block resources with explicit content (i.e. prohibit explicit and adult content).
Unfortunately QuintoLabs does not yet have online package repository for qlproxy so we have to get the CentOS / RedHat RPM package manually from QuintoLabs web site at http://www.quintolabs.com/qlicap_download.php using your favorite browser and upload the package to the system using scp. Another way is to type the following commands in the root terminal (as one line):
curl http://quintolabs.com/qlproxy/binaries/1.4.2/qlproxy-1.4.2-32d12.i386.rpm > qlproxy-1.4.2-32d12.i386.rpm
Wait a little until the download completes (approx. 21Mb) and run the following command to install the downloaded package
rpm --install qlproxy-1.4.2-32d12.i386.rpm
The RPM manager will run for a while and the program will be installed into /opt/quintolabs/qlproxy and /var/opt/quintolabs/qlproxy.
Next step is to configure qlproxy and integrate it with Squid. The configuration files are plain text and stored in /opt/quintolabs/qlproxy/etc/ *.conf, simple to modify with a handful of comments inside. I am going to perform the following modifications:
  1. As I personally do not like excessive advertising on the web and as I often browse through Russian and German sites I will enable extended adblock filtering by uncommenting the corresponding Russian and German AdBlock subscriptions in /opt/quintolabs/qlproxy/etc/adblock.conf file. I also do not like sites tracking me so I usually uncomment easy_privacy subscription in the same file.
  2. My kids sometimes play online games on my computer so I prefer to set the level of adult blocking heuristics to high in the /opt/quintolabs/qlproxy/etc/adultblock.conf by changing from heuristics_level = normal to heuristics_level = high. If anything is falsely blocked by the qlproxy I can later add it to the exceptions.conf file to have it passed through.
  3. The Parental Controls module of 1.4.2 supports filtering of HTML page contents for banned words and phrases (like Dansguardian) and I will enable it too.
  4. The urlblock module that uses community developed database of categorized domains incorrectly puts blogspot.com into an adult category... so I add it to the exception list in /opt/quintolabs/qlproxy/etc/exceptions.conf to be able to read some of my favorite blogs hosted there.
  5. I know that worms, trojans and other malware related software often connect to the world by IP addresses so I put a magic regexp into the /opt/quintolabs/qlproxy/etc/httpblock.conf file to filter them out url = http://\d+\.\d+\.\d+\.\d+/.*
After performing changes make the qlproxyd daemon reload the configuration by
/etc/init.d/qlproxy restart
Next we need to integrate it with Squid. As the qlproxy daemon supports the ICAP protocol this is quite easy, just follow these steps:
  1. Open the /etc/squid/squid.conf in vi by typing
    vi /etc/squid/squid.conf
    in the root terminal.
  2. Add the following lines somewhere at the end of the file:
    icap_enable on
    icap_preview_enable on
    icap_preview_size 4096
    icap_persistent_connections on
    icap_send_client_ip on
    icap_send_client_username on
    icap_service qlproxy1 reqmod_precache bypass=0 icap://127.0.0.1:1344/reqmod
    icap_service qlproxy2 respmod_precache bypass=0 icap://127.0.0.1:1344/respmod
    adaptation_access qlproxy1 allow all
    adaptation_access qlproxy2 allow all
    
Now restart Squid by typing
service squid restart
in the root terminal. After restart try surfing the same sites with your browser and see how nicely ads are blocked. Another useful test is to go to the eicar.com web site and try to download a sample artificial eicar.com virus to see that com files are blocked by the download filter.
The last thing to do is to integrate the qlproxy with Apache to be able to see the reports on user browsing activity. This is actually quite easy, open the /etc/httpd/httpd.conf file and add the following near the
directive:
   WSGIScriptAlias /qlproxy.cgi /var/opt/quintolabs/qlproxy/www/data/qlproxy.wsgi
   
 WSGIApplicationGroup %{GLOBAL}
 Order deny,allow
 Allow from all
   

   Alias /qlproxy /var/opt/quintolabs/qlproxy/www
   
        Options FollowSymLinks
        AllowOverride None
   
Reload the apache by typing in the terminal
service httpd restart
You can navigate to http://proxy.example.lan/qlproxy to see the generated reports. The Negotiate authentication setup described earlier should help with displaying correct user names and not just IP addresses in the activity reports.

Resume

Everything is in place to start the web surfing without needs to provide passwords and without much of the internet trash out there - just point your users browsers to proxy.example.lan port 3128 and enjoy.

Using Active Directory for Authentication in Linux Squid Proxy Server

Use the blue Nav bar above to access the main index pages!

Creating Kerberos Keytab Files Compatible with Active Directory


How to create a keytab file for a Kerberos user logging into Active Directory.  What's a keytab file?  It's basically a file that contains a table of user accounts, with an encrypted hash of the user's password.  Why have a keytab file?  Well, when you want a server process to automatically logon to Active Directory on startup, you have two options:  type the password (in clear text) into a config file somewhere, or store an encrypted hash of the password in a keytab file.  Which is safer?  Well, you can decide.  In any case, you'd better do a good job of protecting the file (be it a config file or a keytab).

Anyway, the accepted way to store a hashed password in Kerberos is to use a keytab file.  Now the file can be created using a number of utilities.  On a Windows machine, you can use ktpass.exe.  On Ubuntu Linux, you can use ktutil.


Before I demonstrate how to create the keytab, a word about encryption.  There are a number of encryption types used for hashing a password.  These include DES-CBC-CRC, DES-CBC-MD5, RC4-HMAC and a few others.  Active Directory uses RC4-HMAC by default.  Back in Windows 2000, you could also use the DES types without any trouble, but since Windows 2003, only RC4-HMAC is supported, unless you make a registry change (to all of your domain controllers).  If you need to use DES for some reason, then refer to the Technet article at the bottom of the page.

Before attempting to create a keytab file, you'll need to know the user's kerberos principal name, in the form of username@MYDOMAIN.COM, and the user's password.

Creating a KeyTab on Windows (tested on Windows Server 2008 R2)
Open a command prompt and type the following command:

ktpass /princ username@MYDOMAIN.COM /pass password /ptype KRB5_NT_PRINCIPAL /out username.keytab
Creating a KeyTab on Ubuntu Linux (tested on Ubuntu 10.10 - Maverick Meerkat)
Open a terminal window and type the following commands:

ktutil
addent -password -p username@MYDOMAIN.COM -k 1 -e RC4-HMAC
- enter password for username -
wkt username.keytab
q

Testing the Keytab File
Now in order to test the keytab, you'll need a copy of kinit.  You can use the version that's on Ubuntu, or if on Windows, you can install the latest Java runtime from Sun (JRE).  In either case, you'll need to setup your /etc/krb5.conf file (on Linux) or c:\windows\krb5.ini (on Windows).  Either file should look something like this:

[libdefaults]
default_realm = MYDOMAIN.COM
krb4_config = /etc/krb.conf
krb4_realms = /etc/krb.realms
kdc_timesync = 1
ccache_type = 4
forwardable = true
proxiable = true

[realms]
MYDOMAIN.COM = {
kdc = mydomain.com:88
admin_server = mydomain.com
default_domain = mydomain.com
}

[domain_realm]
.mydomain.com = MYDOMAIN.COM
mydomain.com = MYDOMAIN.COM

[login]
krb4_convert = true
krb4_get_tickets = false

Once you've got your Kerberos file setup, you can use kinit to test the keytab.  First, try to logon with your user account without using the keytab:

kinit username@MYDOMAIN.COM
- enter the password -

If that doesn't work, your krb5 file is wrong.  If it does work, now try the keytab file:

kinit username@MYDOMAIN.COM -k -t username.keytab

Now you should successfully authenticate without being prompted for a password.  Success!

More Information
If you need to use any other encryption Type than RC4-HMAC, then you'll need to tweak your AD domain controllers.  Please refer to the following TechNet article.