This HOWTO will show you how to set up a Squid proxy server deployed on CentOS or RedHat 6 Linux with web and content filtering done by QuintoLabs Content Security with proxy users transparently authenticated by Windows 2008 R2 based Active Directory. This is the work in progress and all comments are welcomed. The HOWTO is targeted at novice users and may sometimes seem too thorough for more advanced gurus. No compilation magic will be involved in our setup so any system administrator accustomed to Windows will be able to easily follow the instructions. :)
We will use VMWare's Workstation 8 to setup the staging test lab to make sure everything works before deploying it on the production servers and real hardware. The chosen virtualization platform does not really matter much and any other virtualization solution can be successfully used too.
Prerequisites
The test lab will contain three machines - a domain controller running Microsoft Windows 2008 R2 server, a user machine running Windows 7 and a proxy machine running CentOS 6 with Squid Proxy 3 coming from standard repository. I presume you have ISOs of Windows Server R2, Windows 7 and RedHat (CentOS) 6 Linuxes somewhere around you. I also presume installation of Microsoft Windows and Active Directory is not a problem for you.The domain we are creating is called example.lan. The IP addresses in use come from standard network used in NAT networking in VMWare Workstation - 192.168.28.0. Name of the Domain Controller will be dc.example.lan, proxy will be called proxy.example.lan and client workstation client.example.lan.
Step 1. Install Domain Controller
First, perform basic installation of Microsoft Windows and do the initial post install configuration.- Create a new virtual machine for domain controller. Put the Windows Server ISO into the virtual CD drive and install it. Set the Administrator's password to "P@ssw0rd" (without quotes).
- After installation finishes set the static IP address of the server to 192.168.28.20, subnet mask 255.255.255.0, default gateway 192.168.28.2. Set the preferred DNS server to 192.168.28.2. Start the web browser and navigate to your favorite web site to test that Internet connection is working properly.
- Set the time zone on dc.example.lan to the one you live in.
- Change the name of the computer to "dc" (without quotes) so that after installation of the Active Directory and DNS server later our domain controller has the FQDN address of dc.example.lan.
- Click Start - Administrative Tools - Server Manager and run the Roles Wizard to add the "Active Directory Domain Services" role.
- When role wizard finishes, open the command prompt and run "dcpromo.exe" to set up the New Domain in a New Forest. Specify example.lan as the FQDN name of the forest root domain. Leave Forest and Domain functional levels on "Windows Server 2003", mark DNS server as the additional option for this domain controller. When installation wizard complains about "A delegation for this DNS server cannot be created because the authoritative parent zone cannot be found or it does not run Windows DNS server" just say Yes to continue the installation and install a new instance of DNS server on this domain controller. Wait a little until installation is finished. Then reboot the VM.
- Using DNS management snap-in at dc.example.lan create a primary IPv4 Reverse DNS Lookup zone for network id 192.168.28, set Replication Scope "to all DNS servers running on domain controllers in this domain: example.lan" and allow both nonsecure and secure dynamic updates.
- Add new pointer (PTR) record for the dc.example.lan and
check using nslookup that dc.example.lan can be successfully
resolved into its IP address (192.168.28.20) and vice versa.
- Add Host (A) and Pointer (PTR) records for the proxy.example.lan and
check using nslookup that proxy.example.lan can be
successfully resolved into its IP address (192.168.28.21) and
vice versa.
Step 2. Install Windows 7 Client Machine
Now create a VM that will act as a machine for the users of the proxy. Give VM a name - client.example.lan, set up Windows 7 as you normally do, join the machine to the example.lan domain created on Step 1 and make a bunch of domain users that will act as proxy clients.Step 3. Install CentOS Proxy Machine
Create a new virtual machine named proxy.example.lan. Ensure the network adapter is set to "NAT" mode. Start the VM and follow the steps of the CentOS install wizard mostly accepting the defaults. Configure machine hostname as "proxy.example.lan" and root password as "P@ssw0rd" (without quotation marks). Wait a little until the installation is complete and then reboot the system.NOTE 1: For the purpose of this howto I have SELinux explicitly disabled in /etc/selinux/config.
NOTE 2: For the purpose of this howto I have firewall explicitly disabled by typing #chkconfig iptables off and #chkconfig ip6tables off in the root terminal and restarting the proxy.example.lan VM.
Step 3.1 - Configure Networking
CentOS 6 deployed as VM usually does not have network subsystem enabled by default. In order to enable networking we need to do the following:- Set the static IP address in
/etc/sysconfig/network-scripts/ifcfg-eth0
BOOTPROTO=static
NETMASK=255.255.255.0
IPADDR=192.168.28.21
ONBOOT=yes
- Set the default gateway in /etc/sysconfig/network
GATEWAY=192.168.28.2
- Point to the DNS server at dc.example.lan by editing /etc/resolv.conf
nameserver 192.168.28.20
# /etc/init.d/network restart
or by just
restarting the virtual machine. After restart confirm that the
network functions correctly by typing the following commands in the terminal
and watching for any error outputs
$ping -c 3 192.168.28.2
Finally update the VM
# yum update
and install
needed prerequisites for the next steps:
# yum install bind-utils
Step 3.2 - Configure Network Time Synchronization (NTP)
To perform successful Kerberos authentication system time on proxy.domain.lan must be synchronized with system time on dc.example.lan. The easiest way to do that is to install network synchronization server and point it to the domain controller.- Install NTP server:
# yum install ntp - Make it start automatically at system boot time
#chkconfig ntpd on -
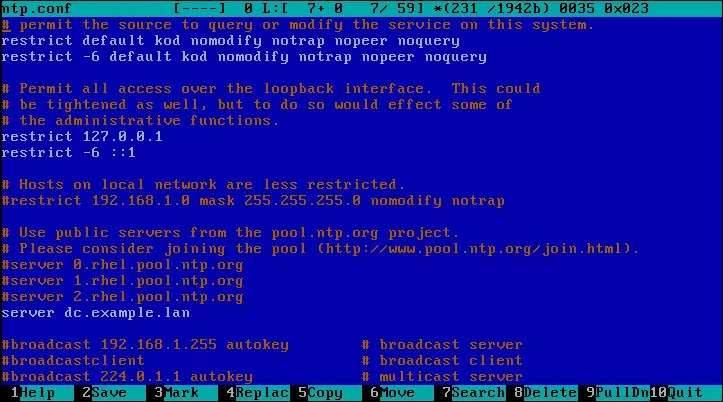
Open /etc/ntp.conf and add the name of the domain controller:

- To perform initial time sync stop the service
#service ntpd stopand run the manual sync command#ntpdate -b dc.example.lanThen start the NTP service again#service ntpd start
Step 3.3 - Install Kerberos
All needed Kerberos packages are installed by default in CentOS. But to ensure you really have all the needed Kerberos packages on the proxy.example.lan type
# yum install krb5-workstation krb5-libs
Kerberos configuration is stored in /etc/krb5.conf,
open it with the text editor and change the contents to the following:[logging]
default = FILE:/var/log/krb5libs.log
kdc = FILE:/var/log/krb5kdc.log
admin_server = FILE:/var/log/kadmind.log
[libdefaults]
default_realm = EXAMPLE.LAN
dns_lookup_realm = false
dns_lookup_kdc = false
ticket_lifetime = 24h
renew_lifetime = 7d
forwardable = true
default_tgs_enctypes = rc4-hmac
default_tkt_enctypes = rc4-hmac
permitted_enctypes = rc4-hmac
[realms]
EXAMPLE.LAN = {
kdc = dc.example.lan
admin_server = dc.example.lan
default_domain = example.lan
}
[domain_realm]
.example.lan = EXAMPLE.LAN
example.lan = EXAMPLE.LAN
To test that Kerberos authentication is set up correctly type in the root
terminal
# kinit Administrator@EXAMPLE.LAN
The
command should complete without errors. The command
# klist
should print the info about acquired Kerberos ticket.
Ticket cache: FILE:/tmp/krb5cc_0
Default principal: Administrator@EXAMPLE.LAN
Valid starting Expires Service principal
12/07/11 11:07:58 12/07/11 21:08:00 krbtgt/EXAMPLE.LAN@EXAMPLE.LAN
renew until 12/14/11 11:07:58
Now reboot the VM.Default principal: Administrator@EXAMPLE.LAN
Valid starting Expires Service principal
12/07/11 11:07:58 12/07/11 21:08:00 krbtgt/EXAMPLE.LAN@EXAMPLE.LAN
renew until 12/14/11 11:07:58
Step 3.4 - Install Samba and Join the proxy.example.lan to Active Directory
NOTE: this step heavily relies on RedHat 6 Documentation side at http://docs.redhat.com/docs/en-US/Red_Hat_Enterprise_Linux/index.html, especially on books "Deployment Guide" and "Enterprise Identity Management Guide".In order to be able to transparently authenticate clients of Squid proxy using their Active Directory's credentials the server with Squid must be joined into the Active Directory domain (i.e. example.lan). The easiest way to do it is to run Samba on the proxy machine.
- Install Samba by typing
# yum install samba - Make it always start at boot time
# chkconfig smb onand# chkconfig nmb on - Open the /etc/samba/smb.conf and ensure its contents look like
this (this is the result of running testparm -s on proxy.example.lan):
[global]
 workgroup = EXAMPLE
 realm = EXAMPLE.LAN
 server string = Samba Server Version %v
 security = ADS
 log file = /var/log/samba/log.%m
 max log size = 50
 cups options = raw

[homes]
 comment = Home Directories
 read only = No
 browseable = No

[printers]
 comment = All Printers
 path = /var/spool/samba
 printable = Yes
 browseable = No
Note we set workgroup to EXAMPLE, realm to EXAMPLE.LAN (capital letters) and security to ads.
- Restart Samba services
#service smb restartand#service nmb restart
Now join the machine proxy.example.lan into the Active Directory:
- Stop Samba services by typing
# service smb stopand#service nmb stop - Initialize Kerberos subsystem on proxy.example.lan by typing
# kinit Administrator@EXAMPLE.LAN, it should ask for password, and complete without errors. - Ensure you got a correct Kerberos ticket by typing
# klist - Join Active Directory by typing
# net ads join -S dc.example.lan -U Administrator%P@ssw0rd. You should get something like this as an output:
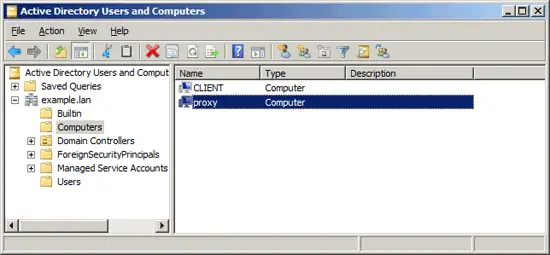
- Open "Users and Computers" snap in on dc.example.lan
and ensure the proxy computer account now present in
the "Computers" tree node
- Reboot the proxy.example.lan VM.
Windows Active Directory Integration - Page 2
Step 4. Install Squid Web Caching Proxy
Now we need to install Squid proxy on the proxy.example.lan and set up the Kerberos Negotiate Authentication so that users do not enter their passwords while browsing through Squid and still we are able to see the user name in the logs.
-
Type
# yum install squid - Open /etc/squid/squid.conf and add the following line
visible_hostname proxy.example.lan. Also
check that http_access allow localnet and
acl localnet src 192.168.28.0/24 are present
in the config file.
-
Make Squid autostart at system boot:
# chkconfig squid on -
Reboot your VM or just start squid for the first time manually
# service squid start


In order to enable Kerberos Negotiate Authentication on Squid do the following:
- Add entry to default keytab file (/etc/krb5.keytab) using Samba:
[root@proxy ~]# net ads keytab add HTTP -U administratorProcessing principals to add...
Enter administrator's password: - Verify the service principals were successfully written to the keytab file:
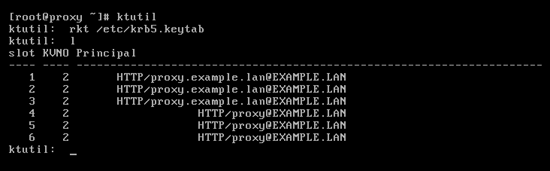
-
Change owner of the /etc/krb5.keytab to squid:squid:
# chown squid:squid /etc/krb5.keytaband set access permissions to 400 (read only)# chmod 400 /etc/krb5.keytabNote: this setup implies Squid is the only kerberized service on the machine, if more kerberized services are present then keytab should reside in /etc/squid directory and Squid must be told to use it through e.g. environment variable KRB5_KTNAME - Add the following to Squid configuration file /etc/squid/squid.conf at the top of the file:
#
# Setup NEGOTIATE authentication for Active Directory with Kerberos
#
auth_param negotiate program /usr/lib/squid/negotiate_kerb_auth -s HTTP/proxy
auth_param negotiate children 10
auth_param negotiate keep_alive on
#
# to see the negotiator log messages in the /var/log/squid/cache.log uncomment
# debug_options 29,9 and pass additional -d parameter to negotiate_kerb_auth
#
acl auth proxy_auth REQUIRED
And the following after the "INSERT YOUR OWN RULE(S)" section:
#
# INSERT YOUR OWN RULE(S) HERE TO ALLOW ACCESS FROM YOUR CLIENTS
#
http_access deny !auth
http_access allow auth

# Example rule allowing access from your local networks.
# Adapt localnet in the ACL section to list your (internal) IP networks
# from where browsing should be allowed
#http_access allow localnet
#http_access allow localhost

# And finally deny all other access to this proxy
http_access deny all
Step 5. Install Apache Web Server
In order to be able to see the status and report information for Squid and QuintoLabs Content Security it is advised to also install Apache.-
Typing the following in the root terminal:
# yum install httpd php mod_wsgi -
Make Apache autostart on boot:
# chkconfig httpd on - Reboot your VM or just start Apache for the first time manually by
typing
service httpd start
Step 6. Install QuintoLabs Content Security 1.4.2
Next step is to install the Content Security 1.4.2 for Squid from QuintoLabs (I will refer to it as qlproxy further in text). For those who do not know, QuintoLabs Content Security is an ICAP daemon/URL rewriter that integrates with existing Squid proxy server and provides rich content filtering functionality to sanitize web traffic passing into internal home / enterprise network. It may be used to block illegal or potentially malicious file downloads, remove annoying advertisements, prevent access to various categories of the web sites and block resources with explicit content (i.e. prohibit explicit and adult content).Unfortunately QuintoLabs does not yet have online package repository for qlproxy so we have to get the CentOS / RedHat RPM package manually from QuintoLabs web site at http://www.quintolabs.com/qlicap_download.php using your favorite browser and upload the package to the system using scp. Another way is to type the following commands in the root terminal (as one line):
curl http://quintolabs.com/qlproxy/binaries/1.4.2/qlproxy-1.4.2-32d12.i386.rpm > qlproxy-1.4.2-32d12.i386.rpm
Wait a little until the download completes (approx. 21Mb) and run the following command to install the downloaded package
rpm --install qlproxy-1.4.2-32d12.i386.rpm
The RPM manager will run for a while and the program will be installed into
/opt/quintolabs/qlproxy and
/var/opt/quintolabs/qlproxy.Next step is to configure qlproxy and integrate it with Squid. The configuration files are plain text and stored in /opt/quintolabs/qlproxy/etc/ *.conf, simple to modify with a handful of comments inside. I am going to perform the following modifications:
- As I personally do not like excessive advertising on the web and as I often browse through Russian and German sites I will enable extended adblock filtering by uncommenting the corresponding Russian and German AdBlock subscriptions in /opt/quintolabs/qlproxy/etc/adblock.conf file. I also do not like sites tracking me so I usually uncomment easy_privacy subscription in the same file.
- My kids sometimes play online games on my computer so I prefer to set the level of adult blocking heuristics to high in the /opt/quintolabs/qlproxy/etc/adultblock.conf by changing from heuristics_level = normal to heuristics_level = high. If anything is falsely blocked by the qlproxy I can later add it to the exceptions.conf file to have it passed through.
- The Parental Controls module of 1.4.2 supports filtering of HTML page contents for banned words and phrases (like Dansguardian) and I will enable it too.
- The urlblock module that uses community developed database of categorized domains incorrectly puts blogspot.com into an adult category... so I add it to the exception list in /opt/quintolabs/qlproxy/etc/exceptions.conf to be able to read some of my favorite blogs hosted there.
- I know that worms, trojans and other malware related software often connect to the world by IP addresses so I put a magic regexp into the /opt/quintolabs/qlproxy/etc/httpblock.conf file to filter them out url = http://\d+\.\d+\.\d+\.\d+/.*
/etc/init.d/qlproxy restart
Next we need to integrate it with Squid. As the qlproxy daemon supports
the ICAP protocol this is quite easy, just follow these steps:- Open the /etc/squid/squid.conf in vi by
typing vi /etc/squid/squid.confin the root terminal.
- Add the following lines somewhere at the end of the file:
icap_enable on
icap_preview_enable on
icap_preview_size 4096
icap_persistent_connections on
icap_send_client_ip on
icap_send_client_username on
icap_service qlproxy1 reqmod_precache bypass=0 icap://127.0.0.1:1344/reqmod
icap_service qlproxy2 respmod_precache bypass=0 icap://127.0.0.1:1344/respmod
adaptation_access qlproxy1 allow all
adaptation_access qlproxy2 allow all
service squid restart
in the root terminal. After restart try surfing the same sites with your browser
and see how nicely ads are blocked. Another useful test is to go to the eicar.com web site and try
to download a sample artificial eicar.com virus to see that com files are
blocked by the download filter.The last thing to do is to integrate the qlproxy with Apache to be able to see the reports on user browsing activity. This is actually quite easy, open the /etc/httpd/httpd.conf file and add the following near the
directive:
WSGIScriptAlias /qlproxy.cgi /var/opt/quintolabs/qlproxy/www/data/qlproxy.wsgiReload the apache by typing in the terminalWSGIApplicationGroup %{GLOBAL} Order deny,allow Allow from all Alias /qlproxy /var/opt/quintolabs/qlproxy/wwwOptions FollowSymLinks AllowOverride None
service httpd restart
You can navigate to http://proxy.example.lan/qlproxy
to see the generated reports. The Negotiate authentication setup described earlier
should help with displaying correct user names and not just IP addresses
in the activity reports.
No comments:
Post a Comment